 Ghost Setup
Migrating from WordPress to Ghost CMS: A Step-by-Step Guide

Introduction
If you’ve been using WordPress for blogging or publishing, but feel bogged down by plugins, maintenance, or security updates — you’re not alone. Thousands of professionals, publishers, and creators are now switching to Ghost CMS for its speed, simplicity, and built-in email membership tools.
In this guide, we’ll show you how to migrate your WordPress site to Ghost CMS step by step — with minimal downtime and maximum SEO preservation.
Whether you’re running a personal blog or a company publication, this guide will help you make a smooth, professional transition.
Why Migrate from WordPress to Ghost?
Before jumping into the process, here’s why so many creators and organisations are making the switch to Ghost CMS:
| WordPress | Ghost |
|---|---|
| Requires frequent updates | Fully managed (Ghost(Pro)) |
| Plugin bloat slows down performance | Built-in SEO, newsletter, memberships |
| Complex security setup | Automatic SSL & CDN |
| PHP + MySQL dependency | Node.js + SQLite (lightweight) |
| Harder to get consistent branding | Clean, modern design system |
Step 1: Export Your WordPress Content
To start, you’ll need to export your posts, pages, tags, and authors from WordPress.
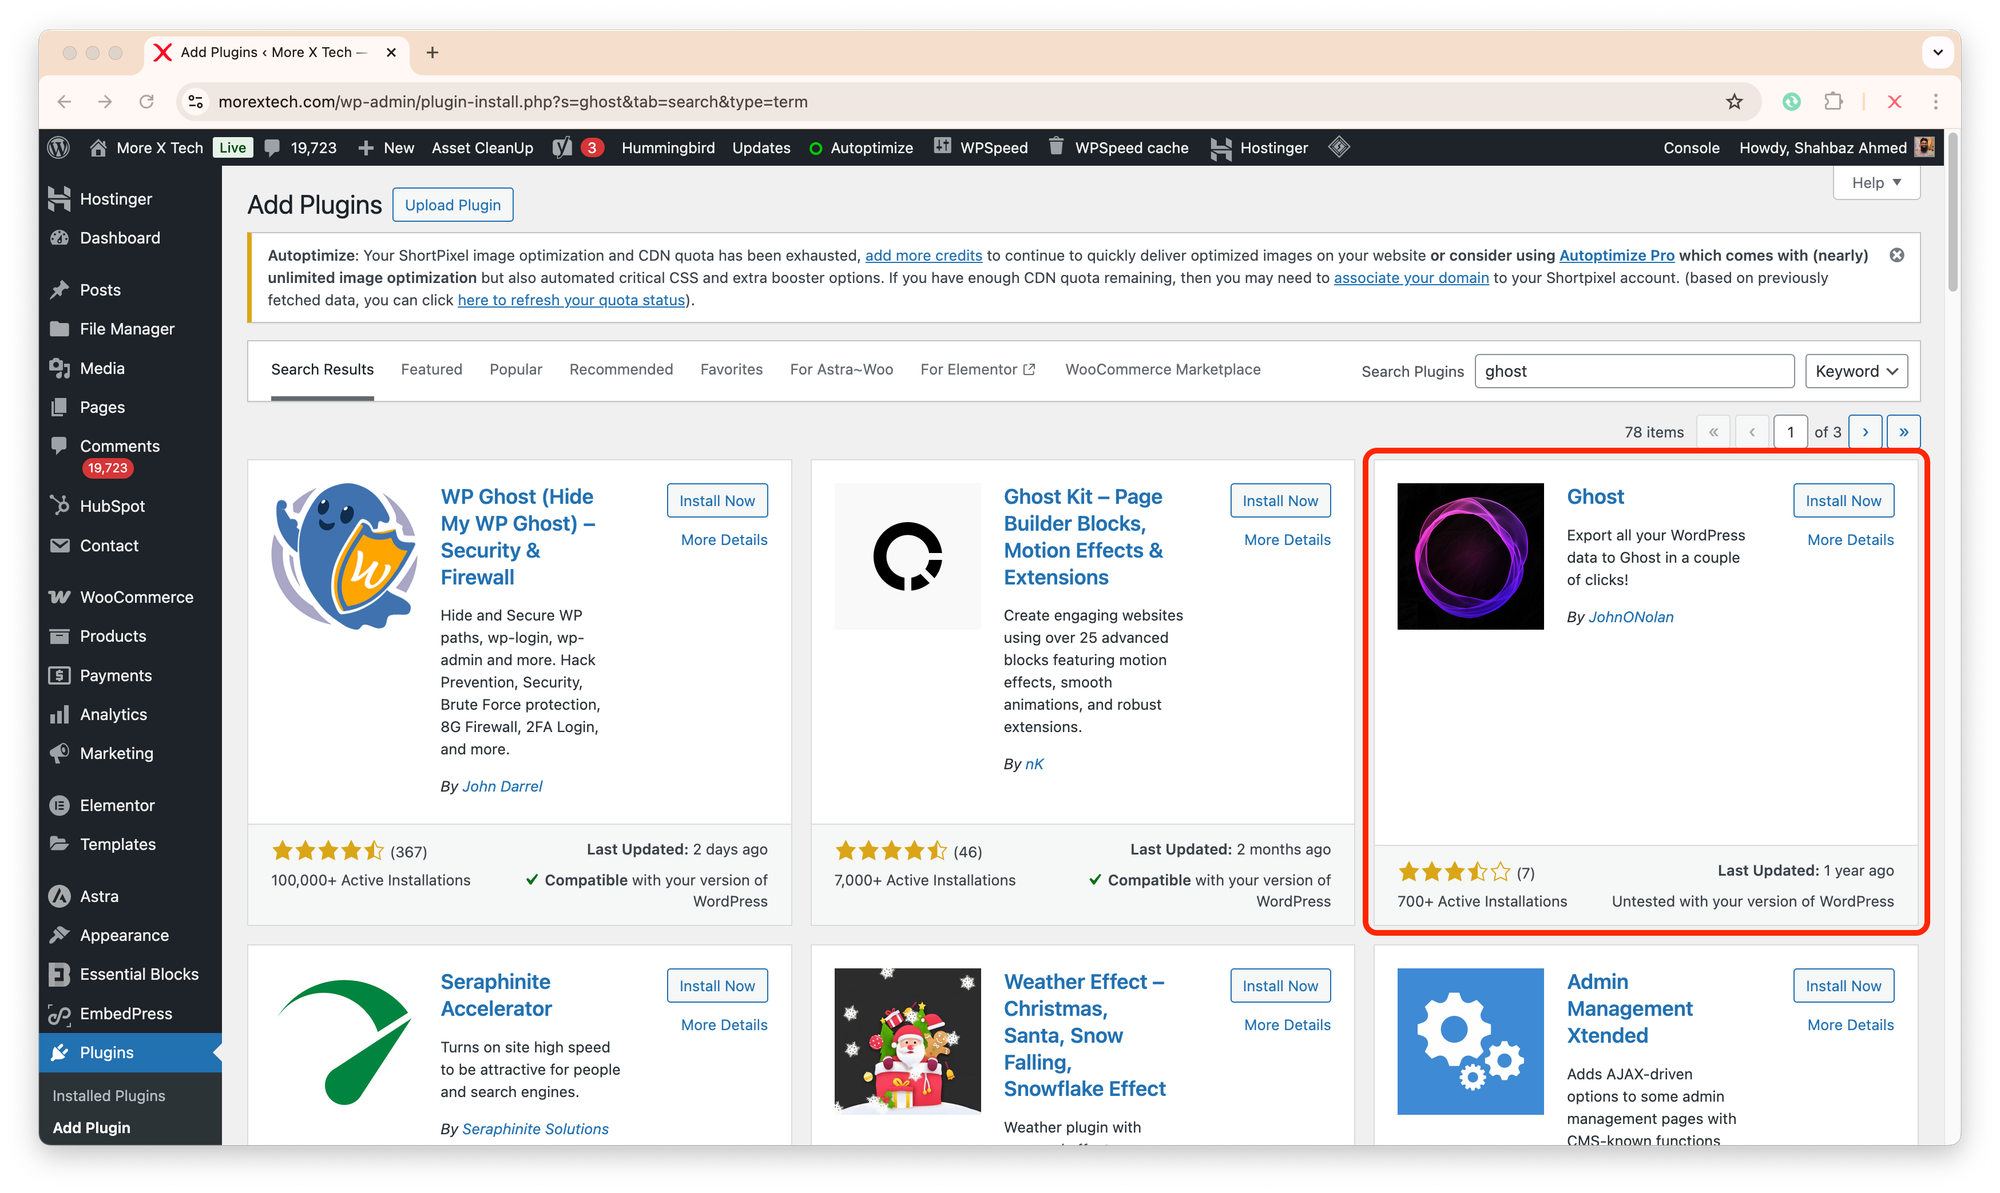
Option 1: Use Ghost’s Official WordPress Plugin (Recommended)
Ghost offers a free plugin that handles content export cleanly.
- In your WordPress dashboard, go to
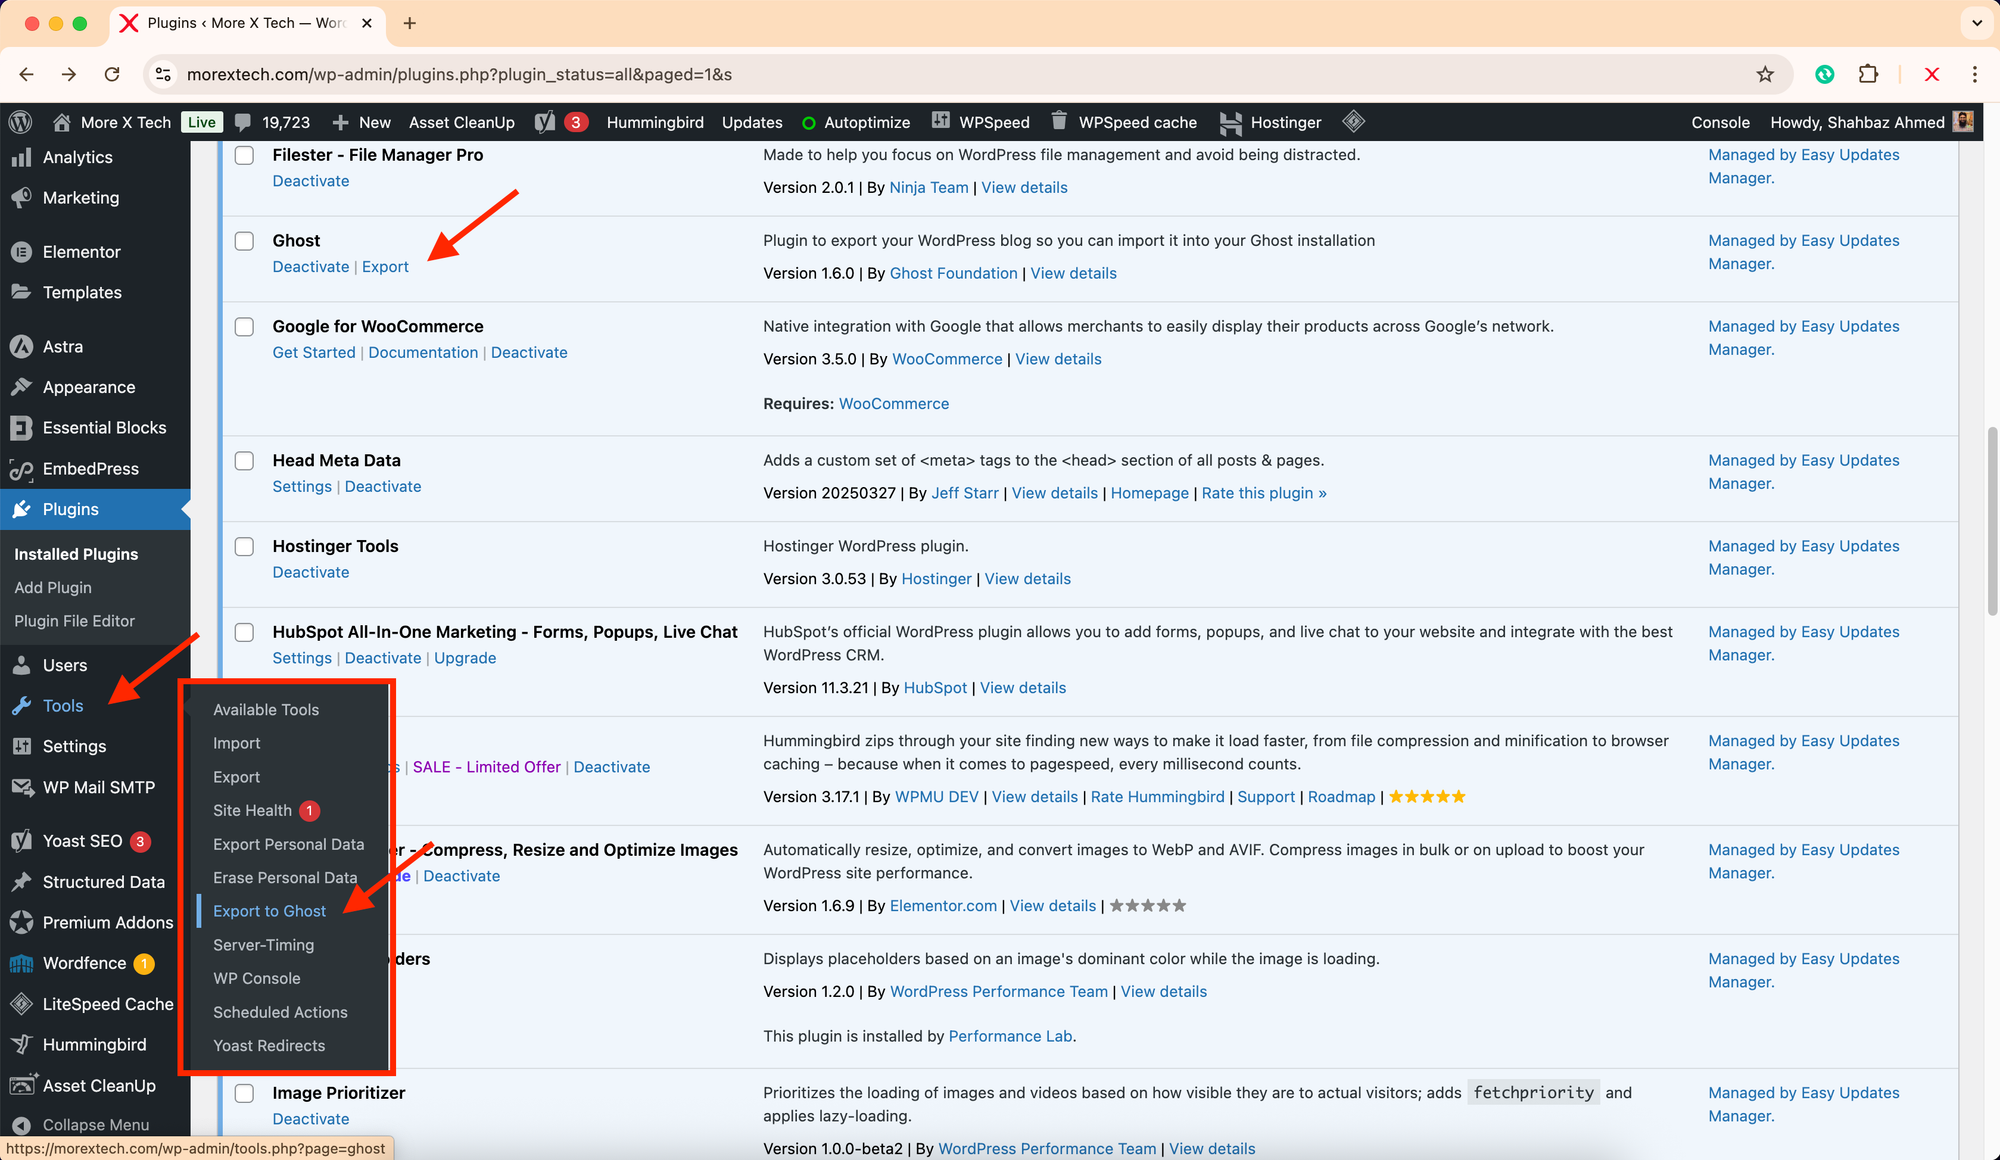
Plugins → Add New → Search “Ghost” → Install “Ghost Export”. - Once installed, use the Export option from Plugins dashboard, or go to Tools → Export to Ghost.
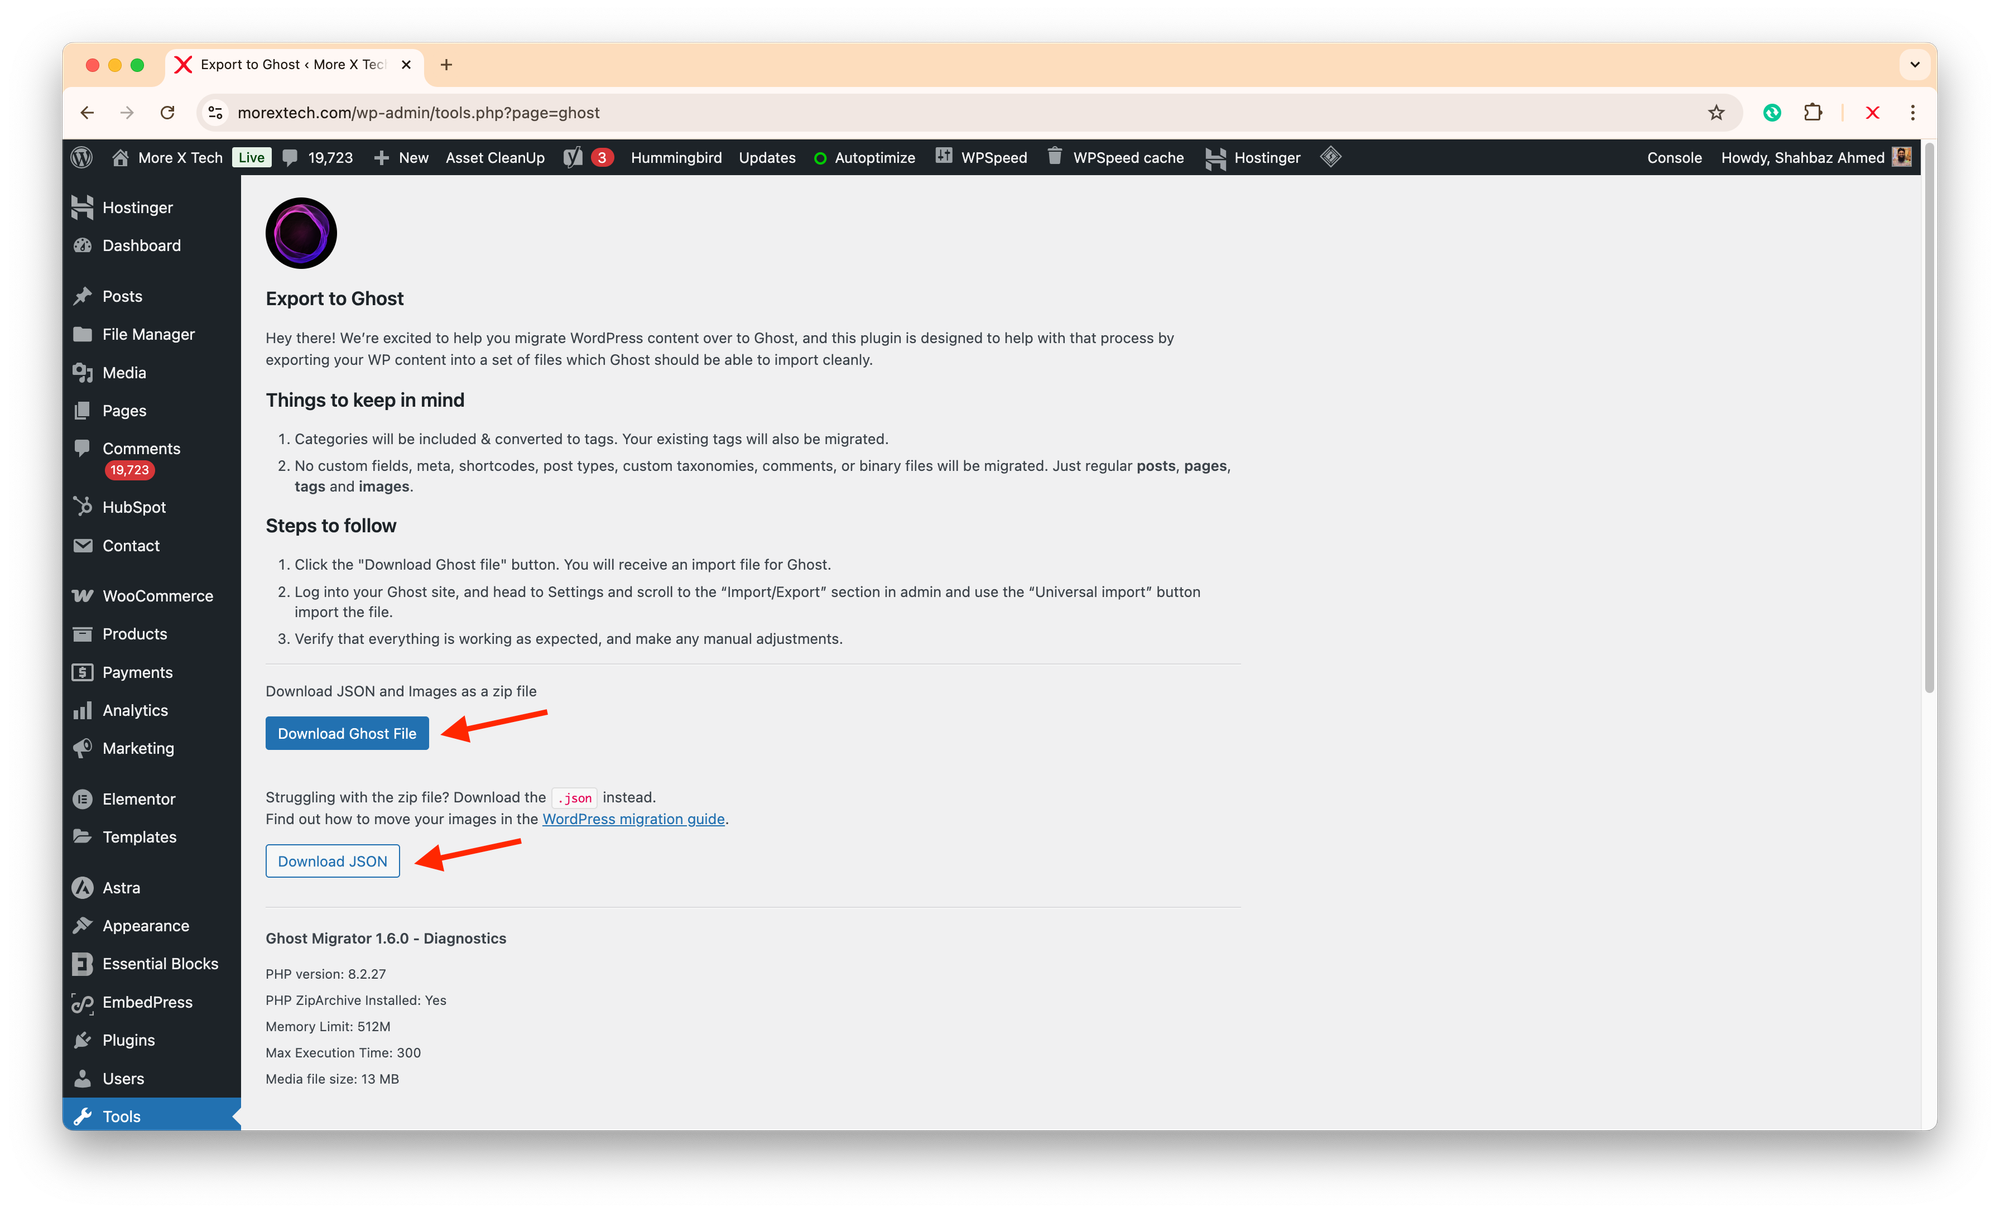
- Click “Export” — it will generate a
.zipor a.jsonfile, whatever you like, containing all your content. - For the JSON option, you will have to download images separately. You may follow these instructions to proceed with it.
- Save that file to your computer.
Option 2: Manual WordPress Export
If you prefer, you can use the default WordPress exporter:
- Go to Tools → Export.
- Choose All Content and click Download Export File.
- Convert it later using Ghost’s import tools (explained in Step 3).
Step 2: Set Up Your New Ghost Site
Next, you need a place to import your content.
If you’re using Ghost(Pro) (recommended for professionals):
- Sign in at ghost.org.
- Create a new site (you’ll get a
.ghost.iosubdomain temporarily). - Go to Settings → General and configure your publication details:
- Title and description
- Logo and favicon
- Accent colour
- Timezone
🧩 Related guide: Setting Up Ghost CMS on a Root Domain via Cloudflare
If you’re self-hosting Ghost, make sure your installation is up-to-date (v5 or newer).
Step 3: Import Your WordPress Data into Ghost
Ghost supports JSON import natively — perfect for the file you exported earlier.
- In your Ghost admin panel, go to
Settings → Labs → Import Content. - Upload your
.jsonfile. - Wait for the import to complete — Ghost will automatically create:
- Posts
- Pages
- Tags
- Authors
Step 4: Move Your Images and Media Files
Your WordPress export doesn’t include uploaded images by default — they live in your /wp-content/uploads/ directory.
To migrate them:
Option A: Manual Upload (for small sites)
- Download your
/uploads/folder via cPanel or FTP. - In Ghost, upload images manually into each post as needed.
Option B: Automated Transfer (for larger sites)
Use the free migrator tool which require some technical expertise. More details are available at: https://github.com/TryGhost/migrate?tab=readme-ov-file
This method helps you to automatically:
- Crawls your live site
- Downloads all images
Then you can import that file into Ghost via Settings → Labs → Import.
Step 5: Set Up Redirects (Preserve Your SEO)
You’ve likely spent time building SEO value in your WordPress URLs — and you don’t want to lose that.
Ghost makes 301 redirects easy with a redirects.json file.
- Create a new file named
redirects.jsonwith this structure:
[
  {
    "from": "/old-post-slug/",
    "to": "/new-post-slug/",
    "permanent": true
  }
]- Upload it via Settings → Labs → Upload redirects file.
If your WordPress URLs used a different structure (e.g., /year/month/post-name), you can create pattern-based redirects too:
[
  {
    "from": "/:year/:month/:slug/",
    "to": "/:slug/",
    "permanent": true
  }
]Step 6: Connect Your Domain
Once your content is migrated, connect your root domain or subdomain to Ghost:
- Go to Settings → Domain in Ghost(Pro).
- Enter your domain (e.g.
yourdomain.com). - Follow the DNS instructions for your Cloudflare-managed domain.
- Wait for propagation — your site should now load under your custom URL with SSL active.
Step 7: Recreate Menus, Navigation, and Design
Ghost doesn’t import WordPress menus or widgets.
Instead, you can rebuild navigation easily under Settings → Navigation.
- Primary navigation: Top menu (Home, About, Blog, Contact)
- Secondary navigation: Footer links (Privacy, Terms, Social)
If you used custom widgets or shortcodes, recreate those manually using Ghost’s editor or embed blocks.
Step 8: Rebuild Your Email List and Memberships
If you had subscribers or an email list in WordPress (via Mailchimp, Jetpack, or Newsletter plugin), you can import them into Ghost.
- Export subscribers as
.csv. - In Ghost admin, go to Members → Import Members.
- Upload the CSV — ensure it includes at least
emailandnamecolumns. - Send a welcome email introducing your new platform.
Ghost’s native email system supports both free and paid memberships via Stripe.
Step 9: Optimise Your New Ghost Site
To ensure your new Ghost-powered site is fully optimised:
- Update your meta descriptions and OG images.
- Add your site to Google Search Console and Bing Webmaster Tools.
- Enable canonical URLs in Ghost → Settings → SEO.
- Use Cloudflare caching and minification for faster loading.
Step 10: Announce the Migration
Once everything looks good, it’s time to relaunch your publication.
- Write a short “We’ve Moved!” post announcing the change.
- Share it on your social channels and email list.
- Explain why you switched — simplicity, performance, and focus.
- Encourage readers to subscribe via Ghost’s built-in form.
Bonus: Optional Enhancements
- Integrate Google Analytics 4 or Plausible Analytics.
- Add social sharing buttons under each post.
- Use Cloudflare Web Analytics for privacy-friendly tracking.
- Add a custom 404 page if you like.
Common Migration Pitfalls (and Fixes)
| Problem | Likely Cause | Quick Fix |
|---|---|---|
| Broken image links | WordPress URLs not rewritten | Use Ghost Migrator tool |
| Redirect loops | Duplicate redirects | Remove overlapping patterns |
| Missing featured images | Theme didn’t import images | Reupload manually |
| Metadata missing | WordPress SEO plugin dependency | Add manually in Ghost |
| Slug mismatch | Permalink structure differences | Use redirects.json mapping |
Conclusion
Migrating from WordPress to Ghost CMS in 2025 is easier than ever. With the official Ghost tools, Cloudflare integration, and built-in newsletter features, you can have a faster, leaner, and more professional site — without worrying about plugins or updates.
If you’d like help migrating your site professionally, More X Tech offers expert setup and migration support for Ghost CMS users:
- Migration Audit – Review and export your WordPress data correctly
- Full Migration Service – End-to-end setup with redirects and SEO retention
- Custom Design Integration – Match your existing brand in Ghost
Contact More X Tech to make your migration effortless and future-proof. Once migrated, you can enjoy our services by subscribing to one of our membership plans for maintaining your website.